Project 110-4
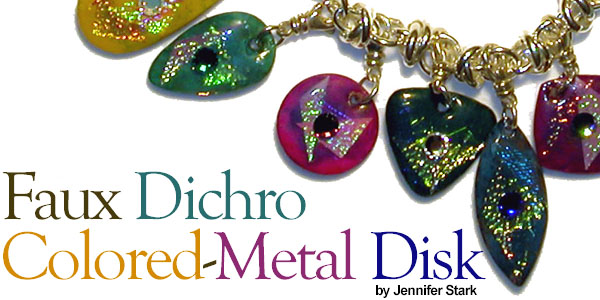
Faux Dichro Colored-Metal
Disk Bracelet
Materials Needed
- Faux Dichro™ Luminous Elements Black Ice Sheets F14-2063BS
- Faux Dichro™ Liquid Glass F14-2071BS
- Sterling silver twisted loop charm bracelet F14-3319JW
- Sterling silver jumprings 4.0mm round 22-gauge F14-2313FD
- Swarovski® Crystal components assorted flat back crystals F14-4593CY
- (10) Sterling silver swivel clasps F14-1869FD
- 1 pkg Patina Metal disks, forest green pear shape F14-6534FN
- 1pkg Patina Metal disks, Olive Brown rectangle F14-6323FN
- 1pkg Patina Metal disks, Sea Foam large triangle F14-6400FN
- 1pkg Patina Metal disks, Gold Color square F14-6301FN
- 1pkg Patina Metal disks, Silver Color large round F14-6362FN
- Hypo Cement tube F14-1956TL· EUROTOOL® tweezers, and pliers
- Scissors
- Nail file or fine sandpaper
- Toothpicks
- Waxed Paper
- Dopp stick for picking up crystals (toothpick with wax on end)
Instructions
1. Place a colored metal disk on a flat level surface with a piece of waxed paper underneath in case the liquid glass spills over the edge of the disk.
2. Cut luminous elements in a desired shape to go on a colored metal disk.
3. Put the liquid glass on top of the disk with the luminous elements. Use a toothpick to spread the liquid glass out to the edges of the disk to get a thin even layer. Pop any bubbles with the toothpick. If you need to add a second layer of the liquid glass, allow a drying time of 1 ½ hours between layers, and after the last coat wait at least 3 hours before you use the disk.
4. After the first side is dry, check to see if any liquid glass spilled over the edge of the disk. If there is any excess, use scissors to cut around the edge of the disk and then file any rough edges smooth using either fine sandpaper or a finger nail file. If liquid glass gets into the hole of the disk, pierce through the hole with a needle.
5. Decorate the other side of the disk repeating Steps 2 and 3.
6. When the disk is completely dry on both sides, place a dot of glue on the disk wherever a flat back crystal would add sparkle.
7. Use the dopp stick to pick up the crystal and place it over the dot of glue. It takes 10 to 15 minutes for the glue to set; the glue dries clear. Flip the disk over and glue a crystal on the other side.
8. Follow Steps 1 thru 7 for all the disks being placed on the bracelet.
9. Using two pairs of pliers, open a jump ring, then slip on a decorated metal disk and a swivel clasp. Close the jump ring. For added security apply a drop of glue to the seam of the jump ring after it is closed. Wait for the glue to dry before attaching the clasp to the bracelet.
10. Repeat Step 9 for all the disks.
11. Decide which order to place the disks onto the bracelet. Use the swivel clasps to attach the disks to the appropriate link in the bracelet. Repeat for all the metal disks.