Project 113-1
Beaded Mesh Pencil Holder
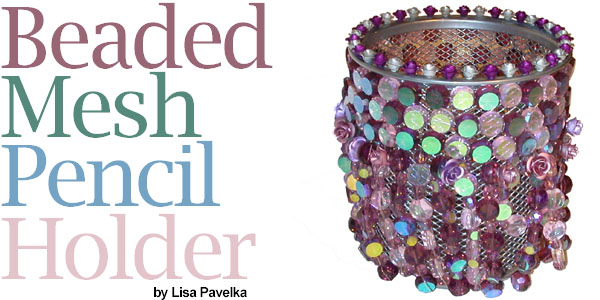
Bead a simple pencil holder using beading wire and crystals to create an elegant desk or boudoir accessory. Tinted aluminum roses add the perfect embellishment to give this project the look of a Victorian vessel. Use the steps in this project to accessorize other mesh desk items.
Materials
- Celestial Crystal™ 10mm purple coin shaped beads F14-8857GB
- Celestial Crystal™ 10mm pink coin shaped beads F14-8861GB
- Celestial Crystal™ 6mm purple coin shaped beads F14-8899GB
- Small (6mm) silver aluminum roses F14-6103FN
- Small (6mm) violet aluminum roses F14-6108FN
- Medium (10mm) pink aluminum roses F14-6114FN
- Medium (10mm) lavender aluminum roses F14-6112FN
- 28-gauge silver beading wire F14-1297WR
- Two-part 5-Minute settling epoxy F14-1954TL
- EUROTOOL® Wire Nippers
1. Cut three, 24” lengths of wire. Twist a small loop at one end of each wire. This will prevent the beads from coming off while stringing.
2. String 31 crystal coins onto each wire strand. Alternate the colors.
3. Starting just under the rim of the pencil holder, twist the end of the first beaded wire strand around the mesh of the holder. Wrap the beaded wire around the holder exterior. Twist the end of the second wire around the mesh, so that the two ends of the strands meet up with one another. Attach the third wire strand beginning on the same side of the holder, to create a back side of the vessel. The bead strands will hang loosely and will be tightened later.
4. Cut 31, twelve-inch long strands of beading wire.
5. Add a large purple crystal onto one wire, leaving a 1-½” tail. Wrap the tail up behind the purple crystal. Twist the wire tail around the remaining length of wire tightly, 3-4 times to secure. Add a small purple crystal, threading it over the excess wire tail. Add the following sequence of beads: large purple, small purple, large purple, small purple, large purple, small purple and large purple. Thread the remaining length of wire through the pencil holder at the base of the lowest beaded strand between two crystals. Weave and wrap the excess wire up and over the three wrapped strands to secure them to the holder.
6. Wrap the remaining wire several times through the mesh just under the rim of the holder to secure. Trim the excess with the wire nippers.
7. Create another strand as in Step 6 using the following sequence: small purple crystal, large pink crystal, small purple crystal, large pink crystal, small purple crystal, large pink crystal, and small purple crystal, large pink and small purple.
8. Wrap and secure this beaded strand between the next two crystals, along the lower row of strands, following the directions to secure and finish as in Step 6.
9. Create more large purple-small purple strands, and more large pink-small purple strands.
10. Attach all of the beaded strands as explained in Steps 5-8, alternating the different sequence strands until the dangling crystal extensions wrap around the entire holder.
11. Attach alternating colors of the large aluminum roses (pink and lavender) to the large purple crystals at the top of each dangling strand.
12. Glue alternating colors of the small silver and purple aluminum roses to the top of the holder rim with the two-part epoxy.
NOTE: Allow the epoxy to fully cure for at least 24 hours.