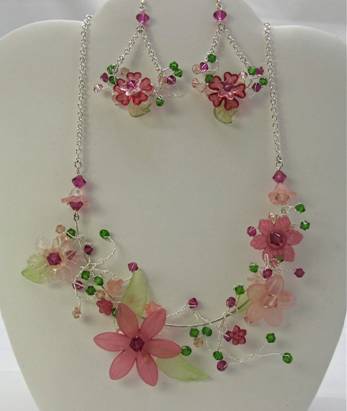
Beaded Branches Necklace and Earrings
Designer: Dale Nicholson
Time required: 2 hours
Intro Copy: Make a sweet wire twisted flower and crystal necklace and earrings using crystals from Create Your Style with Swarovski Elements™ and flowers from Laliberi™
What You Need:
Create your Style with Swarovski Elements™:
4mm crystal bicone beads in your color choice (3 pkgs)
6mm crystal bicone beads in your color choice (1 pkg)
Laliberi™:
Flower value pack
Other supplies:
26 gauge wire spool, silver
20 gauge dead soft wire piece, about 8“long
Medium link silver chain, about 12”
Eye pins, (4 pcs)
6mm Jump rings (2 pcs)
4mm Jump rings (6 pcs)
Lobster Claw (1 pc)
Ear wires (2 pcs)
Tools: Chain nose pliers, Round nose pliers, Flush cutters, chasing hammer, bench block
What To Do (Necklace):
- Pick through the flower pack and sort out a large flower (this will be called the Focal Flower) and also some smaller flowers. On your work surface, arrange the focal flower with smaller flowers on either side with your 3 crystal colors and a few leaves added in. Once you are happy with the general plan, you can start to begin to assemble your piece.
- Cut TWO pieces of 26 gauge wire about 3 feet long. On one piece of wire, thread a bead on to the middle of your wire. Fold the wire in half and twist the wires a few times to secure the bead in place.
- Now thread wire and bead through the center of your Focal Flower. Twist the wire once on the back and then lay the other 3 foot long piece centered over the wire ends and twist both wires together on each side so that you have a tight wire twist of about ½” on each side – this should secure all wires in place to the Focal Flower. As you continue, each side will be twisted into “branches” to make it look naturally attractive.
- On one side of the Focal Flower and using just ONE wire, thread on a 4mm crystal bead. The bead will stop above the twisted wired section. To trap the crystal in place, simply lay the free wire over the crystal to match up with the other wire and then twist the wires together for about another ½ to ¾” (away from the trapped bead).
- To start to create branches, again thread a 4mm bead onto a single wire. This time, to make the branch, hold the bead about ½” above the space where the wires parted and fold the wire down and twist the wires until they meet. Continue the twisting action onto the wire “stem” to create a branch effect.
- Continue to twist your wires together in this branch effect about 6 or more times (or until you are happy with the general appearance). Feel free to add in tiny flower accents instead of a crystal where desired. To finish off the branch, simply wrap down the wire into the stem instead of branching off again.
- Repeat the branch effect on the opposite side of your Focal Flower for about the same amount of distance. The branches need not be identical as it is more about making it natural and freeform.
- Make 2 additional branched sections same as before instead using smaller flowers
- Cut a 6” piece of 20 gauge wire for the necklace base; make small loops at each end and shape it into a soft gentle curve (this will be the shape for the necklace). Harden this wire piece gently with a chasing hammer and pounding block – pound it to the point that the wire shape does not bend easily and has a firm structure.
- Attach each of the 3 “beaded branch sections” one by one: Lay the first one with the Focal Flower in center of the neck base and gently wrap a few branches on to fasten it in place. Then do the same for the other 2 “beaded branch sections”, placing one on either side. Each can overlap the center area slightly and each section can have a little bit of play, as this makes it look natural and lifelike. As shown in the picture, your center “beaded branch sections” does not need to stay in center either – create the design to reflect YOUR personality and personal style.
- Make 2 simple flower connectors as shown: string a crystal and a tulip flower onto an eye pin. Add another crystal and finish with a loop. Repeat to make second connector. NOTE: these connectors do not have to be identical.
- Add the connectors to the wire ends of the necklace by opening the loops and closing again.
- Cut two 5 inches of chain and attach each end to the connectors.
- Attach a 6mm jump ring to one end of the chain along with a lobster claw. Attach another 6mm jump ring to the other chain end to finish.
What To Do (Earrings):
- Follow the directions above to make your beaded braches with a flower and leaf in the middle about 4 inches long.
- Make the earring base by cutting a 1-1/2 inch piece of 20 gauge wire and make a small loop at each end. Shape each gently into a small curve. As with the necklace, gently harden this wire with a chasing hammer and pounding block. Attach the “beaded branch section” to curved wire by gently wrapping a few branch sections to secure it in place.
- Make a crystal connector: string a crystal bead on to an eye pin and finish with a loop. Attach this to an ear wire.
- Cut two 1 inch pieces of chain and connect both to a 4mm jump ring, then to the other end of the connector.
- Attach the chain ends to the curved wire earring base with 4mm jump rings.
- Repeat all steps to make other earring.
Project Tips, Notes, & Techniques: This is a free-form project that is created in stages. There are a number of color palettes in the flowers to choose from, so have fun designing a necklace set that works with your favorite crystal colors or that complements your wardrobe and personality best! |