www.beadsbaublesandjewels.com
1608-2 Print | Close [X]
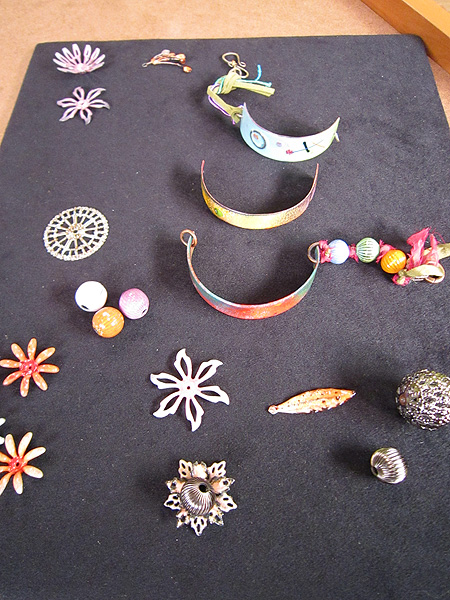
Barbara Lewis adds color to metal beads using torch fired enamel and then assembles them in an artistic bracelet.


Please note that parts of this project are in PDF format and require Adobe Reader or a compatible viewer:

Adobe Acrobat reader can be downloaded for free at: 


Please Note: Some of the PDFs are large and can take time to download and display. Visitors with low bandwidth connections or older computers may wish to right click on the links and choose "Save Target As" to download the file directly to your system before viewing.


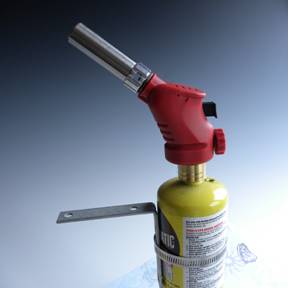
Always wear safety eyewear when using all mechanical tools. Follow manufacturers’ instructions when working with tools and torches.

What makes the Painting with Fire technique of torch firing so special?


I love teaching Painting with Fire (PWF) workshops because I get high off the enthusiasm of my students!  Who wouldn’t love to see a stream of happy faces leave a workshop?  Can you imagine enameling 50 beads in an afternoon as a rank beginner?  How about enameling a bead in 40 seconds?  No, I’m not crazy!

It’s a simple technique and easy to learn. It’s also affordable because there are few tools involved and the ones needed are inexpensive. Let me walk you through the technique.
Here’s a photo of the torch.  The fuel is a 1 lb. canister of map gas.  It burns hot and clean and can be found at nearly any hardware store (Lowe’s, Home Depot, Ace, True Value, etc.)  Plumbers commonly use map gas. It costs between $7 and $10 per canister and gives 8 hours of steady firing.  We have all of the tools and several enamels conveniently packaged in a kit for sale at my website, except for the map gas, which you’ll pick up at the hardware store!  Around the gas canister you’ll notice a hose clamp and angle bracket used for clamping the torch to the table, which makes for a very safe firing experience.  Make sure that the nozzle of the torch and the angle bracket are facing in the same direction.


                                         Macintosh HD:Users:drjameslewis:Desktop:Jewelry Blog:Photo 1 - Torch.jpg

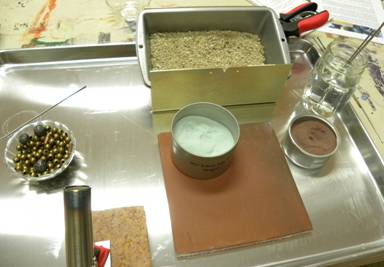
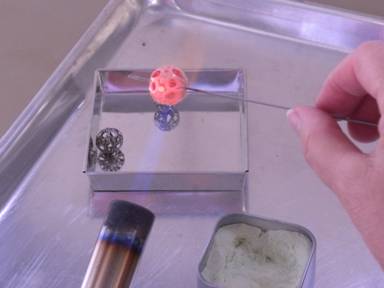
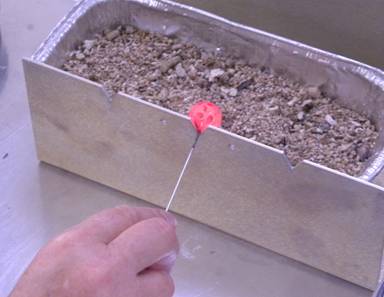
The rest of the workstation looks like this …

                                        Macintosh HD:Users:drjameslewis:Desktop:Photo 2 - Work Station Set-Up.jpg

This is the set up for a right-handed person.  The torch is on the left and the patent pending bead pulling station is on the right (that’s the metal contraption with the “v” notch). If you’re left-handed, reverse everything. There’s also a non-flammable work surface, a bread pan filled with vermiculite, enamels, beads, a jar of water, and stainless steel rods called “mandrels.”  The vermiculite simply provides a nonflammable cushion onto which we drop the bead.  The water is used to quench the mandrel between beads. 
Here’s the process …

                                       Macintosh HD:Users:drjameslewis:Desktop:Photo 3- Heat Bead.jpg

Put an iron or copper bead on the mandrel. Heat the bead in the flame. When it glows orange, immerse the bead in enamel and tap the mandrel on the side of the metal container to remove the excess enamel.  Repeat the heating and dipping process two more times.

                                      Macintosh HD:Users:drjameslewis:Desktop:Photo 4 - Immerse the bead into enamel.jpeg

Remove the bead by pulling it off the mandrel at the bead pulling station.

                                     Macintosh HD:Users:drjameslewis:Desktop:Photo 5 - Remove Bead from Mandrel.jpg

That’s it!  There’s no cleaning or pickling of the metal because the heat does that for us.  No Klyr-fire or other fixative is necessary because the enamel immediately begins to fuse to the hot metal when the two come in contact.  We’ve just eliminated two very time-consuming and tedious steps that are necessary in other types of torch firing.
I hope you enjoy the project from the book.  The technique really is as easy as it looks.  We have a community of jewelry artists with a touch of pyromania at www.paintingwithfire.ning.com, where it’s all about torch firing enamel.  I hope you’ll join me there.
Supply website: www.paintingwithfireartwear.com
Author website: www.torchfiredenameljewelry.com
Networking group: www.paintingwithfire.ning.com
Blog:  www.paintingwithfireartwear.blogspot.com


Harem
I can’t decide if this is a bracelet or an anklet. It can only be an anklet if you’re willing to break out into dance when you wear it! Whatever you decide, this piece is fun and easy to make. It’s perfect for the hodgepodge of leftovers on your worktable—a “bench collection” of sorts. Don’t dwell on planning your design; if you go with the flow, it will truly reflect you and your work.

BBJ_1608-2.pdf

Materials
Findings
1⁄4" × 7" (6mm × 17.78cm) foam tube
1⁄4 yard (0.23m)
woven fabric
19-gauge annealed steel wire
22-gauge
sterling wire
assorted manufactured beads and flower bead caps
eight 11mm solid jump rings
four 12mm corrugated iron beads
one copper-plated lobster clasp
ribbon and fiber strands
two 17mm iron flower bead caps
Enamels
Clover, opaque (1715)
Lime Yellow,
transparent (2230)
Pumpkin, opaque (1850)
Turquoise, transparent (2435)
White, opaque (1055)

Tools
chain-nose pliers
iron and ironing
board or mat
round-nose pliers
scissors
spray adhesive
wire cutters

Preparing Fabric
for Cutting Bias Strips

Establish the straight of grain: Use scissors to place a snip into the selvedge edge of woven fabric, about 1" (2.54cm) from the cut edge. (The selvedge edges are the two finished edges of the fabric as it comes from the factory.) Tear the fabric at the snip.

Establish the bias grain: Place the fabric on a flat surface. Pick up one corner of the fabric and bring the end diagonally across the fabric so that one torn edge of the fabric will rest on top of one selvedge edge of the fabric. Press the fold with an iron.

1. Use the directions at left to establish the straight of grain and the bias grain for ¼ yard (0.23m) of woven fabric. Cut through the ironed fold in the fabric. 

2. Measure and mark 1" (2.54cm) from the cut edge along the length of the fabric. Cut a 15" (38.1cm) bias strip.

3. Spray adhesive on a 1⁄4" × 7" (6mm × 17.78cm) piece of foam tubing. Starting at one end and working across, wrap the bias strip around the foam.

4. Enamel four 12mm corrugated beads: one in White with Lime Yellow on top, one in White with Turquoise on top, one in Pumpkin and one in Clover (see Torch-Firing Beads on page 16). Enamel two 17mm flower bead caps in Pumpkin and Clover.

5. Thread a 4" (10.16cm) segment of 22-gauge sterling silver wire through a solid jump ring and make a wrapped loop. Thread a bead cap, an enamel bead and another bead cap onto the wire.

6. Make a wrapped loop flush against the bead cap, but before finishing it, attach a small rhinestone dangle link (see Making Wrapped Loops on page 25). Wrap the loop with the excess wire. Create six dangles.You can choose to add different enamel and manufactured findings to the dangles as desired. Go wild!

7. Wrap a bundle of ribbon and fiber strands around the tubing, starting 1" (2.54cm) from the end. Tie the ends in overhand knots to secure.

8. Slide a dangle onto the bracelet. Wrap another ribbon and fiber bundle after the first dangle to keep it from sliding on the bracelet. Continue sliding on dangles and wrapping bundles on the bracelet, stopping 1" (2.54cm) from the end and ending with a ribbon and fiber bundle. 

9. Pierce the end of the foam bracelet with 3" (7.62cm) of 19-gauge annealed steel wire. Fold the ends up, keeping one end longer than the other. Wrap the shorter wire end around the longer wire end.

10. Thread an enamel bead cap onto the wire. Trim the excess wire and make a simple loop flush against the bead cap (see Making Simple Loops on page 25). Attach an 11mm solid jump ring to the loop.

11. Repeat Steps 8 and 9 on the other side of the bracelet, but attach a lobster clasp before closing the simple loop.


Barbara Lewis & Katie Hacker
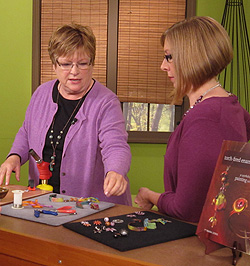
Copyright © 2012 Beads Baubles & Jewels. All Rights Reserved.