| www.beadsbaublesandjewels.com BBJ – the source for jewelry making, beading, and metal work: instructions, education and projects from leading jewelry designers, and instructors. The online home of the public television program. |
| 1703-3 | Print | Close [X] |
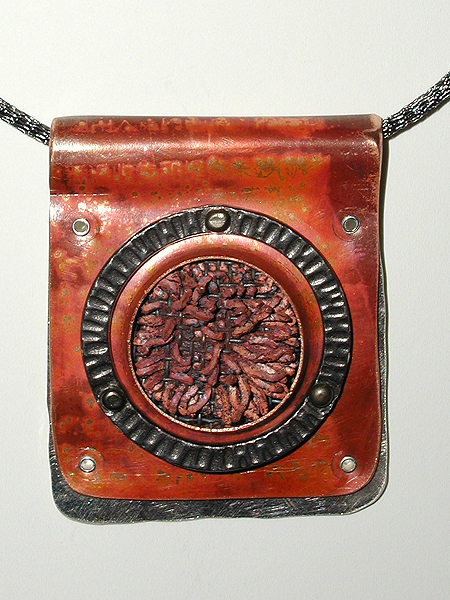
| Mary Hettmansperger uses copper clay with pewter findings to create unique window focal points. |
For More Information Visit: www.tierracast.com www.craftoptics.com |
Focal point necklace - Mary Hettmansperger
DESCRIPTION OF PROJECT – MAJOR TECHNIQUE(S) DEMONSTRATED
Materials: Prepare the focal point: Step #1 – Using Art clay copper and a stainless screening, push a small ball of clay through the screen to create an extruded element. Step #2 – Let clay dry and once it is completely dry, torch fire with a hand held propane torch or follow kiln-firing instructions on the Art Clay copper packaging. Next: Step #1 – Cut shape for necklace – 2 inches by – 3 1/2 inches – rectangle – Copper. Step #2 – Heat copper sheeting, 24 gauge - to anneal and use flux with a rubber stamp to create pattern on the metal. Step #3 – Cut silver sheeting, about 2x2 inch square – just a little bit larger than the copper diameter on 3 sides Step #4 – On the silver rectangle, texture and hammer the edges to create interest. Step #5 – Using a disc cutter, cut a hole in the copper piece, using a disc cutter . Step #7 – Using a large ring component from TierraCast, punch 3 holes in the ring. Step #8 – Sandwich the elements together – the ring component on top of the copper around the lip of the window to accent. Attach by using the holes in the ring as a pattern and attach to the copper with brads. Step #9 – Once the ring is attached to the front, take the extruded copper clay on the screen and place inside the window. Step #10 – Punch holes in the copper on the corners about ¼ inch from the edges use the copper as a template pattern to punch the holes in the back piece of silver. Do one hole at a time and set an eyelet to secure the piece together one eyelet at a time. Step #11 – Roll the copper top to create a hanger and insert neck chain.
|
Mary Hettmansperger  |