Tools
You will need:
- Tube cutting pliers
- Jeweler’s ruler
- Permanent marker
- Jeweler’s saw and cut lubricant
- Salon boards
- Wire flush cutters
- Medium wrap and tap pliers
- 1.8mm hole punch pliers
- Solder setup
Materials
- One 1x1 square 24 gauge copper sheet
- 3/32” rivet tube
- 16 gauge copper or sterling wire
- Hard, medium, and easy paste solder.
Steps
Making and soldering a tube Bail
Mark a ¼” length on your rivet tube using your ruler and permanent marker. Use the tube cutting pliers to cut the tube. File the cut ends with a fine grit salon boards. Apply a thin strip of hard paste solder along one side of the length of tube with your solder pick. Remember, you don’t need much! Place the tube section on the upper left hand corner at an angle to the edge of the copper square and solder in place. Pickle, quench, and dry as always.
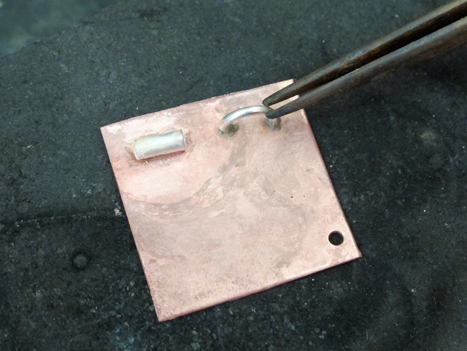
Make and solder a half ring bail
Use 16-gauge wire to make a 2-loop coil around the small barrel (5mm) of the medium wrap and tap pliers. Use flush cutters to cut a half ring from the coil. File the ends of the half ring flush with fine grit salon board if needed. Place medium solder on each cut end of the half ring and place in the upper right hand side of the copper square.
Lay the tile flat on your kiln brick and use the third hand to hold the half ring upright while soldering. You may need to elevate the base of the third hand to have it at the proper angle. Test, quench, pickle, and dry as always.
Make and solder a jump ring bail
Use the flush cutter to cut a jump ring from the coil you made in the last step. Punch a hole in the bottom right hand corner of your tile. Insert and close the jump ring. Position the tile in a groove in the kiln brick. If your brick does not have a groove, carve out a shallow one using the point of your soldering tweezers. Sit the tile in the groove so that the jump ring lies flat on the kiln brick and the join is exposed (away from the tile). Place a tiny bead of easy solder on the join in the jump ring with your solder pick. Begin heating as always, the solder should flow quite quickly, melting into the join as it does. Remove your torch, quench and pickle as always.
|