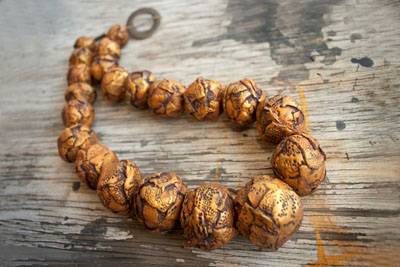
 Big Bead Necklaces Big Bead Necklaces
The Sculpey Way..
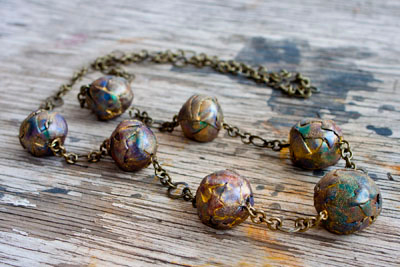
All the drama and not the weight!
Supplies:
- Sculpey UltraLight Clay – package
- Premo! Sculpey Gold clay (or color of your choice!) - 1-1/2 packages
- Sculpey Clay Conditioning Machine
- Large texture stamp or course sandpaper
- Brown and dark Gray acrylic craft paint, small foam brush
- Jacquard Metallic gold stamp pad (optional)
- Circle cutter (about 1 inch) or any shape cutter
Have on Hand:
- small spray bottle of water
- Hand held power drill with bit sized to your stringing material
- stringing materials - 18 gauge wired stinging material, such as Aculon, large clasp
 Pinch off some of the UltraLight clay and flatten to a pancake in your hand. Set the Sculpey Clay Conditioning Machine on #1 (widest setting) and carefully roll through the machine. (NOTE: You can also use an acrylic roller to roll the clay out by hand, the goal is an even sheet, it doesn't matter how thick it is.) Pinch off some of the UltraLight clay and flatten to a pancake in your hand. Set the Sculpey Clay Conditioning Machine on #1 (widest setting) and carefully roll through the machine. (NOTE: You can also use an acrylic roller to roll the clay out by hand, the goal is an even sheet, it doesn't matter how thick it is.)
- Use your cutter to cut out the clay for the largest ball. Mine is about 7 pieces of the circle clay put together.
- Roll the clay into a round ball and set aside. The next TWO balls should be with slightly less clay, so I used 6 pieces from the cutter. Roll these into two balls and set aside. Repeat cutting one less piece for each smaller ball. I cut four equal balls with 4 pieces and six balls with 3 pieces each for the top.
- Bake the completed balls as directed on the clay package and allow to cool.
NOTE: The cutter is used only to deliver an equal amount of clay each time, it doesn't matter the size or shape. Just count how much it takes to make your largest ball and reduce from there – you can also cut the shapes in half and quarters if necessary to reduce the amount of clay in each ball.
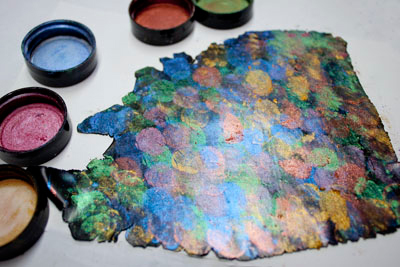
- While the UltraLight balls are baking, roll out 1/3 package of the Gold clay on the #1 (widest) setting of the Clay Conditioning Machine and then set it to #3 and roll it through again to make a thinner sheet of clay.

- If you are using a texture stamp, lightly spray it with water. Place the sheet of clay on a clean sheet of paper and place this on a hard surface floor. Place the stamp on to and step on the stamp. This will create an evenly embossed image of the large stamp. Pick up the sheet of paper, remove the stamp and there you go! Peel the paper away from the clay.
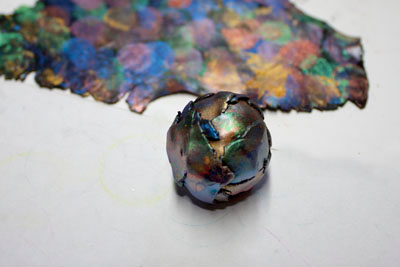
 Once the UltraLight balls are baked and cooled, begin tearing small pieces of the stamped clay and collage them onto the balls, pressing them firmly into place. Cover the entire set of balls in this fashion, repeating step 2 as needed to make more textured clay. Once the UltraLight balls are baked and cooled, begin tearing small pieces of the stamped clay and collage them onto the balls, pressing them firmly into place. Cover the entire set of balls in this fashion, repeating step 2 as needed to make more textured clay.
(NOTE: if you are using rough sandpaper instead of a stamp, just tear the smooth sheet of clay and cover the ball. Once the ball is covered, texture it with the sandpaper.)
 Bake the balls again, using the directions on the Premo! Sculpey clay package. Allow the balls to cool. Bake the balls again, using the directions on the Premo! Sculpey clay package. Allow the balls to cool.
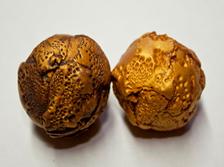 Antique the surface of the beads by painting the entire surface of the COOLED bead with a combination of the brown and dark grey paint. Immediately wipe the surface of the bead with a damp paper towel to remove the excess clay from the upper surfaces of the bead. The paint dramatically brings out the textures of the bead. Antique the surface of the beads by painting the entire surface of the COOLED bead with a combination of the brown and dark grey paint. Immediately wipe the surface of the bead with a damp paper towel to remove the excess clay from the upper surfaces of the bead. The paint dramatically brings out the textures of the bead.
- If you wish, you can rub the painted, dried bead across the metallic inkpad to add some highlights. Allow to dry.
- Drill the beads with the hand held power drill and string!
|