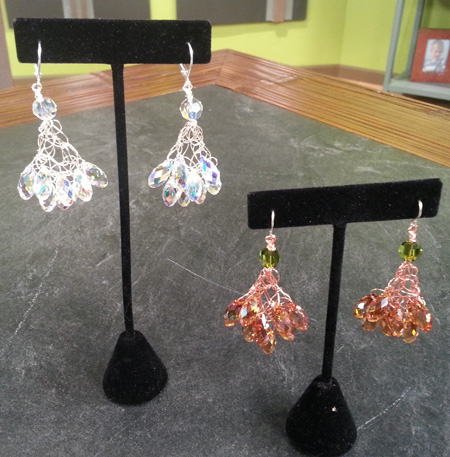

Twisted Crystals Earrings, Crystal AB©
By Create Your Style for SWAROVSKI ELEMENTS Ambassador
Laura Timmons of Vintage Moon Creations©
Swarovski Elements Needed:
*6010 (Briolette Pendant), 13x6.5mm, Crystal AB, quantity 16
*5328 (Xilion), 8mm, Crystal, quantity 2
Additional Supplies:
*1 spool of non-tarnish wire 26 gauge, silver
*2 Earring wires in gold
*Crochet hook size I or 5.5
*Angle Edge Cutters
*Round Nose Pliers
*Bent Nose Pliers
Tips:*When crocheting your wire, don’t get caught up in trying to create perfect circles. You will never notice them once you have braided your piece. Some of the more unusual and interesting pieces, are created with inconsistent chains. As long as you keep consistency in your size (about the size of a large pea) your gauge will be fine.
Getting Started:
1st Layer: Feed 5 Briolettes onto your wire. Beginning with a 6 inch tail of wire, chain stitch 2 empty chain stitches. Feed one Briolette into your next chain stitch, repeating this with the additional 4 Briolettes. Chain 2 empty chain stitches, cut your wire-leaving a six inch tail, and gently pull through – being careful not to lose your last chain stitch.
2nd Layer: Feed 3 Briolettes onto your wire. Beginning with a 6 inch tail of wire, chain 1 empty chain stitch. Feed one Briolette onto your next chain stitch, repeating this with the additional 2 Briolettes. Chain 1 empty chain stitch, cut your wire – leaving a six inch tail, and gently pull through – being careful not to lose your last chain stitch.
***Repeat this process again for the other pair of earrings.
Almost There:
Bring the wires of each layer together, creating a tear drop effect, and place layer 2 on top of layer 1. Twist the end together a couple of times. Take 1 length of your wire and “sew” your layers together by going up and down through both layers of wire securing them in place. Bring the end back to the top, and twist your wires together again 1 more time.
The Finishing Touch:
Now slide your Xilion bead down over all 4 wires. Twist some more creating a nice finished effect to the top of your wire. Create a wire wrap loop at the top of the Xilion bead with your round nose pliers. After creating a couple of wraps at the base of your loop, cut your wire sclose to your wrap, and using your bent nose pliers, smooth the edges into the existing wrap. Now you are ready to feed your earring onto your earring wire.
©2010 Vintage Moon Creations, Laura R. Timmons, vmc@kc.rr.com, www.vintagemoon.net
“Sparkle” your Imagination….”Embellish” Your Creativity!™

|