Supply List
- Round foam loom
- E-Z Bob bobbins (8)
- C-Lon or S-Lon cord
- Glue – recommend E-6000
- Wildfire to tie braid ends off
- Size 6 seed beads – 20 grams
- 3mm Swarovski crystal bicones - XX
- Crimp end caps
- 4mm jump rings
- Clasp of your choice like toggle or lobster claw
There is a simple formula for figuring out how long the cords need to be in order to make the length project you desire.
To be safe, you’ll need 3 times the finished length of your project of EACH cord. That might be a little overkill, and you may have too much cord at the end, but if you run out of cord, there’s no way to fix it. So in this case, more is better.
Example: I’m making a 7 inch bracelet. So I will need 21” of cord for each of my 8 cords
After you have all the cords cut to the proper length, gather them together and tie an overhand knot with them at one end.
One cord at a time, wrap each cord around a bobbin, leaving about 6” free between the overhand knot and the bobbin.
Place the knot in the center hole of your loom, with the cords lying over the top.
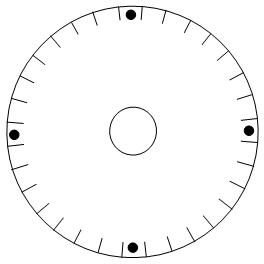
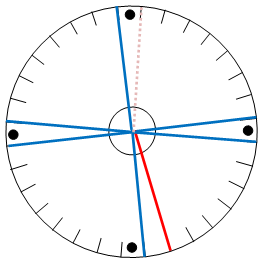
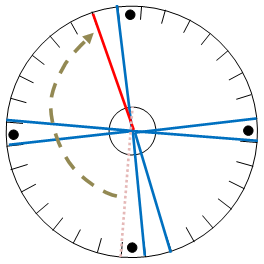
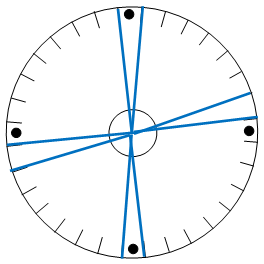
 Now we’ll place each cord in the proper slit on the loom to make our pattern. We’ll be putting one cord on either side of the black dots. Now we’ll place each cord in the proper slit on the loom to make our pattern. We’ll be putting one cord on either side of the black dots.
Tip: Hold the knot with your non-dominant hand from under the loom, and use your dominant hand to arrange the cords. This way you can pull the cords with a firm tension, and keep the knot roughly in the center of the inner hole.
Stringing beads
We’re finally ready to add beads! The C-Lon or S-Lon is a stiff thread, and you shouldn’t have too much trouble placing your beads on the cord without any needle at all. If necessary, you can use a Big Eye Needle to assist in stringing the beads.
You will string four strands with 50 size 6 seed beads each, and four strands with 50 crystals each. This will give you more than you need to complete your bracelet. At the end when you’ve reached the length you desire, you can just pull any remaining beads off the ends.
String the appropriate number of beads on each of your 8 cords. How many is that??? Well, I’m giving guidelines below – the only thing to remember is that not all Size 8 (or 6 or whatever size) seed beads are the same size. They vary by manufacturer. You can always add or remove the beads later, so this isn’t a now or never kind of decision.
Beads per inch
- Size 8 beads – 7 beads per inch
- Size 6 beads – 5 beads per inch
When you finish stringing the beads on a cord, attach a bobbin at the end and wind it so the beads are sitting right below the disk and there’s no extra cord between the beads and the bobbin. This is temporary, but I find it’s easier to add the rest of the beads when the cords are more controlled. I wait until I’m completely finished stringing all my beads before I worry about which cord is in what slot.
To create the pattern we want, you will place the strands with the seed beads in the two slots on either side of the top of the loom, and the other two on the right side of the loom. The crystals go on the bottom and left side.
 We finally get to start moving our cords in a repetitive pattern, which will make our braid. It is the placement of our beads in the set-up step that makes the design. We finally get to start moving our cords in a repetitive pattern, which will make our braid. It is the placement of our beads in the set-up step that makes the design.
We’re making what is known as a Round Braid.
We’re going to start by braiding cord only – no beads! This is so we have a place to tie off and glue the braid to fit in the endcap later.
Step One: Take the cord on the top right, and move it down so it’s in the slot to the right of the pair of cords on the bottom.
Step Two: Take the cord on the bottom left, and move it up so it’s in the slot to the left of the cord left on top.
Tip: To remember the order, try this cheat phrase: It’s downright (down right) uplifting! (Up left)
 Step Three: Rotate the entire loom a quarter turn to the right. Now numbers 24 and 25 should be at the top. Step Three: Rotate the entire loom a quarter turn to the right. Now numbers 24 and 25 should be at the top.
You may want to actually draw an arrow on the surface of your loom to remind you what direction to turn in. You can choose to turn left or right – whatever feels most natural to you – but choose a direction and stick with it the rest of your life!
And that’s it – our whole pattern - repeat all three steps again until you have the length you desire:
- Right moves down
- Left moves up
- Rotate a quarter turn to the right
It’s not often you’ll get to sit down and make an entire braid uninterrupted. The first way to deal with needing to take a break, is to make the first half of your move (Right moves down) so you have 3 cords at the bottom and only 1 cord at the top. Go do what you need to do. When you come back, you’ll be able to look at it and know that you need to finish the rest of your move (Left moves up.)
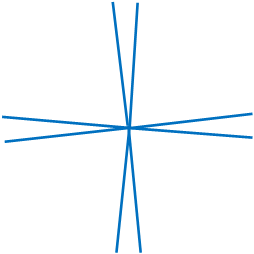
But what if you don’t get a chance to make your half-move to mark your place? No problem. Take a look at the cords on the loom. There will be 2 cords that are on top, moving in opposite directions. If you move the loom so those top cords are sitting in the East/West position, which will put you in the right place to start your next braiding move (Right moves down.)
Work about ¼” of all cords until you start adding beads in with each move.
Once you have ¼” of braid with the cords only (and you feel confident you’re making the moves correctly), you’ll start to add 1 bead to the braid each time you make a move.
Here’s my process for moving the beads into place:
- Before I take the cord out of the slot, I pick up the bead and slide it upwards
- Then I pop the cord out of the slot and drop the bead down so the bead gets caught under the top (closest) thread sitting in the East/West position. This is the same cord you look for to be on top when you lose your place.
- The bead does not need to be completely under the cord. Just “caught” by it, so it won’t pop loose. It’s okay if it’s sitting in a wonky position!
- Move the cord to the finish position
- You will add a bead EVERY time you move a cord until you finish your length.
- If the bead isn’t sitting well, sometimes a small twist of the braid below can help the bead settle into place.
- Take your time while you make your moves. You have long strands of seed beads underneath your loom that can tangle if you don’t move in a slow and deliberate way.
- When you’re making the Down/Right move, you can help the bead fall into place under the thread by holding the cord you’re moving up, and sweeping it along like you’re following the outside curve of the loom.
- When I’m making the second half of the move (i.e., the move from bottom to top) I find I usually have to get the bead into place by using the pinky finger of my top hand to nudge it into place, and sometimes the thumb of my bottom hand can help guide it into place also.
- Hold some tension in the cords with your bottom hand holding the braid below the loom.
- Keep the top of the braid a little below the hole.
- When you move the cords, place them firmly in the slots
- Try to keep the top of the braid roughly in the center of the hole. You’ll need to stop and re-adjust the cords to get it in the middle periodically.
- Your clasp and end caps will account for 1.5” of the length. Example: My bracelet needs to be 7” long, so when I subtract 1.5” for the clasp and end caps, the beaded section of my braid needs to be 6.25”.
- Whoops! I made it too long and I’ve already finished off the ends! Now what? You might be able to find a smaller clasp (for instance, a magnetic clasp takes up less length.)
- Whoops! I made it too short! Add an accent bead or two near the clasp to add length. How? After you’ve put the end caps on the ends and wrapped the bottom, shorter wire – string a bead or two on the longer end of the wire and THEN add the clasp.
Using a crimp end cap with a loop on top
Spread glue over the end of your braid, making sure to cover the binding thread too. Insert your braid end into the bead cap and wipe away any excess glue. Gently crimp down with a flat nose pliers. Let it dry for 24 hours before attaching your clasp with a jump ring to the bead cap loop.
For more information visit www.tapestrybeads.com
|