Materials:
14-Gauge Sterling Silver Wire, Dead Soft (about 8 or 9 inches)
18-gauge, 4.0mm inside diameter sterling silver jump rings (2)
Sterling Silver Ear Wires—1 pair
Tools and Supplies:
Wubbers Oval Mandrel Pliers—Jumbo
Wubbers Classic Pliers—Medium Flat and Large Flat or Bent Nose
Lindstrom Shears
Solder Cutting Pliers
Sterling Silver Sheet Solder—Hard or Medium
Charcoal Block
Butane Refillable Torch
Soldering Pick
Tweezers—Stainless Steel
Pickle Pot, Sparex, and Copper Tongs
Dome Faced Chasing Hammer
Steel Block
Safety Glasses
Brass Brush
Polishing Cloth
Safety Tip:
Remember to always protect your eyes with safety glasses when making jewelry.
Before you start:
Fill a small crockpot about half full with water and plug the crockpot in to begin heating the water. Mix about ¼ cup Sparex into the water and stir with a pair of copper tongs to dissolve. Avoid skin contact. Pickle works best when hot, but not boiling. To learn more about how to use pickle and safety practices, visit Wubbers University at www.wubbersu.com.
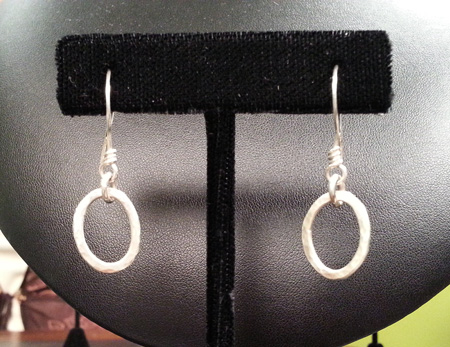
- Using 14-gauge dead soft sterling silver wire, form large oval-shaped jump rings around the large barrel of the Jumbo Wubbers Oval Mandrel Pliers.
- Cut the wire with a pair of Lindstrom Shears to make two oval jump rings.
- With two pair of Wubbers Pliers, close the jump rings using a back and forth, twisting motion.
- Placed the oval shapes on a charcoal block and spray or coat them with self-pickling flux.
- Cut the sheet solder into tiny squares (you will only need 2-4 pieces of solder) using a pair of solder cutting pliers or shears. Coat the solder pieces with flux.
- Dry the flux on the ovals quickly with the torch, then turn it off and set it safely aside.
- Place a tiny piece of solder on the joint of each oval where the cut ends meet.
- Holding a soldering pick in your dominant hand and a torch in the other, begin to heat the first oval evenly. When the flux turns clear, begin to watch closely for the solder to flow. It will look very shiny, similar to mercury. Avoid overheating the metal—if it turns bright red, reduce the heat.
- Solder the second oval together as described in Step 8 and let cool slightly.
- Quench both ovals in cool water.
- Using copper tongs, carefully lower the ovals into the warm pickling solution. After 2-3 minutes, remove the ovals and rinse thoroughly in cool, clean water. Dry each oval thoroughly.
- With a polished, dome faced chasing hammer and a polished steel block, gently flatten each oval to the desired width. Take care to hammer with light taps so as not to distort the oval shapes.
- Use the ball peen end of the chasing hammer, lightly tap and begin to add texture to each oval. After achieving the desired texture, hammer right along the outside of each oval to slightly bevel the edge.
- Brush each oval with a soft brass brush. Achieve a beautiful shine with a polishing cloth that contains polishing compound.
- Open a 4.00mm inside diameter sterling jump ring using a Wubbers Classic Medium Flat Nose Pliers and Bent Nose Pliers. Attach an oval to one of the ear wires. Repeat with the second oval to create a beautiful pair of earrings.
Design Tip: Design additional shapes of earrings using Jumbo Wubbers Mandrel Pliers in Round, Square, and Triangle Shapes. It looks great to dangle a bead in the geometric shaped earrings.
www.jewelrytools.com |


