
Project 206-2
Beading Lesson
Creating Easy Chandelier Earrings
By Katie Hacker
Sponsor:
Beadalon®
Chandelier earrings are hot! This beading lesson will show you how to use beading wire, head pins and eye pins to make your own one-of-a-kind designs.
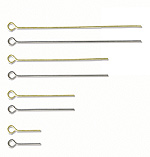
 Head
pins and eye pins are pre-made pieces of wire. Head pins have a flat surface
on one end, similar to a nail head. Eye pins have a loop on one end.
Head
pins and eye pins are pre-made pieces of wire. Head pins have a flat surface
on one end, similar to a nail head. Eye pins have a loop on one end.
To create a dangle, string a bead onto a head pin. Make a loop above the bead and cut off any extra wire. Next, string a small bead onto an eye pin. Make a loop and attach it to the first beaded head pin to make a longer dangle. Use the same technique to make two more short beaded head pins.
Next, string the longest dangle onto the center of a piece of beading wire. Use a piece of silver-plated beading wire that's 4" long. String beads onto each side, then add a short dangle and a smaller bead.
 Bend
the wire in a teardrop shape and place both ends inside a decorative eye
crimp. Use chain nose pliers to crimp it. You can also use an EZ-Crimp
end, or you could place both wires through a crimp tube, make a loop and
then crimp the tube. Attach the upper loop to an ear wire.
Bend
the wire in a teardrop shape and place both ends inside a decorative eye
crimp. Use chain nose pliers to crimp it. You can also use an EZ-Crimp
end, or you could place both wires through a crimp tube, make a loop and
then crimp the tube. Attach the upper loop to an ear wire.
This is just one simple way to make your own chandelier earrings from
scratch. You can also attach beaded head pins and eye pins to pre-made
chandelier components