Project 206-4
Crystal Choker & Chandelier Earrings
By Katie Hacker
Sponsor:
Pure Allure
Create you own style with new designer metal components from Pure Allure.
These beautiful castings feature fine hand set Swarovski® crystals
and allow you to make your own designer-looking jewelry at home.
Materials Needed
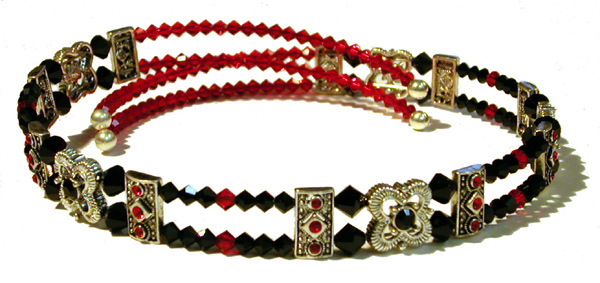
Choker:
5 square metal sliders with inset jet Swarovski® crystals
10 rectangular metal sliders with inset siam Swarovski® crystals
20 jet Swarovski® crystal 6mm bicone beads
48 jet Swarovski® crystal 4mm bicone beads
96 siam Swarovski® crystal 4mm bicone beads
2 pieces of 2 1/2-loops-long necklace memory wire
4 round 5mm silver memory wire end caps
Bead Fix glue
Beadalon® memory wire shears
Earrings:
2 metal chandelier components with inset siam Swarovski® crystal
2 jet Swarovski ®crystal 6mm bicone beads
10 jet Swarovski® crystal 4mm bicone beads
6 siam Swarovski® crystal 4mm bicone beads
5 silver 1” head pins
BeadalonrRound nose pliers
Beadalon wire cutters
Instructions for the choker:
- String a square metal slider onto the center of one necklace wire. String a second wire through the other set of holes on the slider.
- String a 6mm bicone onto each wire on one side of the slider.
- String a rectangular metal slider onto the wires, placing one wire through the upper holes and one wire through the lower holes.
- String three 4mm jet bicones, a siam bicone and three more 4mm jet bicones onto the wire on one side of the square metal slider.
- String a rectangular metal slider onto the wires, and then string a 6mm bicone onto each wire.
- Repeat Steps 1-5.
- String the following beads onto the wires to complete the beading pattern on one end of the choker: square metal slider, 6mm jet bicones on each, rectangular metal slider, 22 siam bicones on each.
- Glue a memory wire end cap onto both wire ends. Let the glue dry.
- Repeat Steps 1-7 on the other side of the center slider to make the necklace symmetrical. Cut the wire ends to 1/8,” and attach memory wire end caps.
Instructions for earrings:
- String a 4mm jet bicone onto a head pin. Make a loop above the bead; repeat. Attach one to each outer loop on the earring component.
- String a 6mm jet bicone, a 4mm siam bicone and a 4mm jet bicone onto a head pin. Make a loop. Attach it to the center loop on the earring component.
- String a 4mm jet bicone and a 4mm siam bicone onto a head pin and make a loop; repeat. Attach one to each remaining loop on the earring component.
- Repeat instructions for other earring.
- Variation: Using the same basic techniques, experiment with different combinations of crystals, sliders and components to create your own style!