www.beadsbaublesandjewels.com

BBJ – the source for jewelry making, beading, and metal work:  instructions, education and  projects from leading jewelry  designers, and instructors.  The online home of the public television program.
2105-1 Print | Close [X]

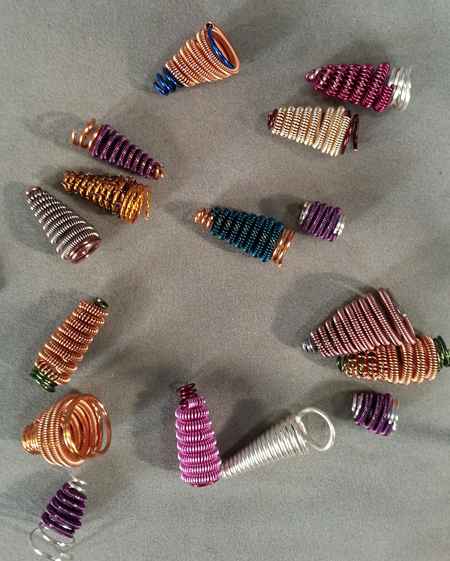
Sandra Lupo uses the ancient art of wire coiling to make wire-wrapped cones for end caps, tassel toppers and other creative embellishments. 

Watch the video for this project online at:
http://youtu.be/vjR-jO1BkxY


For More Information Visit:


www.beadalon.com


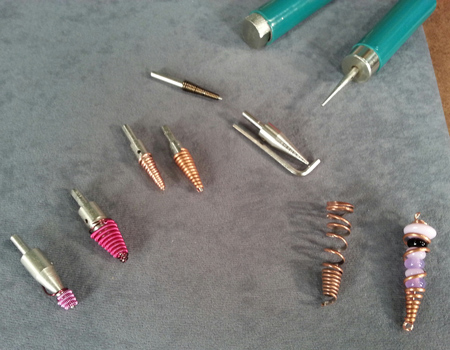
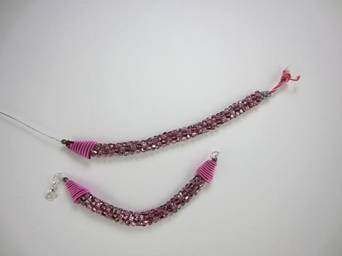
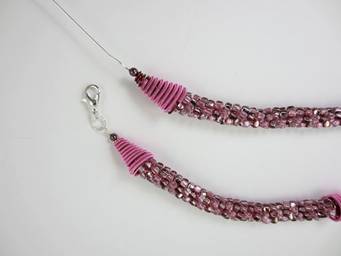
BEADED  KUMIHIMO BRACELET WITH CONETASTIC CONE ENDS
By Sandra Lupo with Marsha Freedman
 (Original beaded kumihimo concept for this article was designed by Linda Johnson, former proprietor Extraordinary Beads, Clinton, New Jersey

Conetastic Cone Mandrel Tool Set is licensed to Beadalon by Sandra Lupo, Inventor


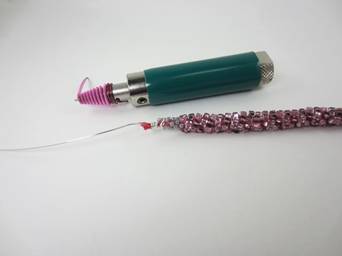
CONETASTIC CONE MAKING – Specific colors to pink/mauve sample shown in finished image of pink/mauve beaded Kumihimo bracelet
Wires to use:
One spool 26g rose Artistic Wire as coil made on a 16g thin steel rod creates a  8-9” long coil for one cone – need two lengths for two cones
2 feet 18g burgundy Artistic Wire as core wire for coils to form cones

Note: See package instructions and Sandra Lupo’s videos on Beadalon.com for set up and basic use of Conetastic Tool.

Note: See Beads, Baubles and Jewels, Series 2100, show 2105 for two segments on Conetastic Tool and Kumihimo Braiding.

HOW-TO MAKE THE CONE
STEP 1
-- Insert one coil - 9” length of rose 26g wire onto the 2 feet of core wire – 18g burgundy
--Insert the 18g burgundy wire through the guide hole of the cone mandrel
-- Turn the core wire around the base of the large (11mm diameter) cone mandrel (flat part)
--Do not tighten as you wind – best done manually for control with fingers holding wraps as formed
--Wrap 2 or 3 times with bare burgundy core wire and then shimmy up the coil to cover the bare wire as you wish.
--Continue to hold the coils in place as you form to avoid gaps, wind the coiled core wire around the mandrel about 7 complete coils (using about 8” of the 9” of coil as stated above)
-before reaching the tip of the cone mandrel, trim the coil ONLY from the core wire
--finish with bare core wire to the very tip (see finished image)
REPEAT for the other cone

HOW TO ADD CONES AND CLASP SET
STEP 2
With the cut, glued and wired ends completed in STEP 7 of BBJ 2105-2, add the wire cone formed in STEP 1 above to the braid end.

IMAGE 1 (glue wired braid end with cone forming on Conetastic)

Place the cone onto the 20g silver wire that is wound onto the braid end.
Snug the cone down to hide the 8/o beads and first row of 5/o beads.
Place the mauve round 4mm pearl onto the 20g wire coming through the cone.

IMAGE 2 (cone placed on braid end)

IMAGE 3 (end ready to loop and add clasp)

Snug up to leave no space
Form a simple or wrapped loop
Add an open twist jump ring
Add the lobster claw

Tighten the core wire of the cone (if necessary) so that no wire end is showing.
(Use a half/round half/flat pliers to tuck the wire end into and under the cone)
REPEAT FOR THE OTHER SIDE OF THE BRACELET, adding only a jumpring to this end.
(For longer length – use longer clasp such as a toggle clasp set and/or add additional jumprings to each side)

For more information visit www.sandsstones.com


Sandra Lupo & Katie Hacker

Copyright © 2014 Beads Baubles & Jewels. All Rights Reserved.