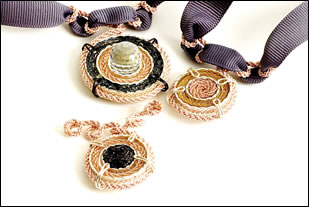
Frame and capture a Katydids channeled bezel with this fabulous new Artistic Wire Braid from Beadalon! First, fill the channels with either resined snippets of specialty ribbon (for a faux geode look), or inset more of the wire braid. Then wrap both a fun self-bailed bezel (in one of the fabulous wire braid metal choices) and a capture to hold all the elements (with the XCapture finding) all on the Now That’s a Jig! Then finally, thread a ribbon through for a beautifully finished look.
Materials
(Cut-to-length Pendant Necklace)
Tools & Supplies
- Wirework Toolbox
- Ruler
- Heavy duty semi-flush wire cutters*
- Chainnose pliers*
- Nylon-jawed pliers
- Bench block or anvil
- Hammer: chasing or nylon hammer (non-ferrous)/tack or small utility (ferrous)
- Needle file
- Sharpie, Extra fine point
- Tweezers
- Wire brush or steel wool (fine, 00)
- Renaissance wax and soft cloth
- Now That’s a Jig! TM Toolkit
- StartrKit (JigBed, Bracket, StartrPeg Pak, Screwdrivr) (www.BrendaSchweder.Etsy.com)
- NTaJ! SwiveLokTM
- NTaJ! WireLiftrTM (optional)
- NTaJ! BigRoundsTM: 1” and 1.25”
- NTaJ! SmallRoundsTM: 1/8” (4)
- NTaJ! MicroPegsTM: 1/16” (4)
* When using dark annealed steel, use pliers (and tools) dedicated for steel wire use.
Step-by-Step
Now That’s a Jig! Set-up
- Download the NTaJ! Katiedids Self-BailedFrame and XCapture pattern templates and print onto vellum paper at actual size.
- Place the Self-BailedFrame pattern onto the JigBed, perfectly aligning the corner holes. Punch through each corner hole with the PatternPunchrTM and screw a CornerTakTM in each.
- Punch through the screw-holes as indicated on the pattern with the PatternPunchrTM and screw in the BigRound and 1/8” round pegs for the appropriate size KatieDids bezel (25- or 35mm) with the ScrewDrivr.
- Punch the hole for the adjacent SwiveLokTM placement as indicated on the pattern and rough-tighten with the ScrewDrivr.
Create the Katiedids Self-BailedFrame
- Center the 10” (for the 25mm Katiedids Self-BailedFrame set up and 12” for the 35mm) Artistic Wire Braid on top of the appropriate setup and trap it between the BigRoundTM peg and the SwiveLokTM. Tighten the SwiveLokTM.
- Bring the wire evenly down and around the BigRoundTM peg and make a complete TwistTie wrap close to the center point of the bottom.
- Following the wire path on the template, wrap the tail originally from the left side completely around the first 1/8” round peg and then the second trailing back up toward the top.
- Loosen the SwiveLokTM, swing it away from the wire braid, and cut the braid tails as indicated with a heavy duty semi-flush cutter.
- Repeat the last two steps with the remaining tail, but to the left set of pegs.
- File the ends smooth with a needle file and set aside.
Create the XCapture Pendant
- Ready the jigbed with the XCapture vellum template pattern as for the KatieDids Self-BailedFrame as above. (Note: This pattern does not utilize the SwiveLokTM.)
- Holding the 14” length of either the 20 gauge silver-filled or 22 gauge dark annealed steel wire (for the 25mm KatieDids channeled bezel) (or the 16” length for the 35mm KatieDids channeled bezel) below the center of the appropriate setup, wrap the wire around the pegs following the wire-path on the template in numerical order and making sure to pass through the center 1/8 inch round pegs in the center. End with the wire tail pointed up between the top legs.
- Wrap that tail tightly under the center (vertically) and back up to the same position, being sure to trap the bottom tail.
- Wrap the bottom tail tightly to one side, under the center (horizontally), and back up completely to the same side.
- Trim both tails close to the center intersection.
- Carefully nudge the wires of each leg close together, working up to the MicroPegsTM. (Note, each tip will resemble a Q-Tip with a rounded tip at the end.)
- Lift the capture up and off the setup and gently harden and flatten with a small nylon or rawhide hammer. (Or a tack or small utility hammer if working in dark annealed steel.) Hammer gently where the wire overlaps so as not to sever the wire in the capture.
- File the ends and set aside.
- If working in dark annealed steel, clean with steel wool and seal with Renaissance Wax by rubbing a tiny amount (as you would lip gloss) over the component. Then, buff with a clean cloth.
Embellish the KatieDids Channeled Bezel
- Fill the channels of the KatieDids bezels with more of the artistic wire braid (either laid-in or spiraled), or snippets of specialty ribbon.
- Top with two-part epoxy resin according to manufacturer’s directions to act as a setting agent. Let cure overnight. (Note: Cover any holes in the bezel with tape ahead of time.)
Assemble the Whole
- Pick up the filled KatieDids Channeled Bezel and fit the KatieDids Self-BailedFrame around it.
- Center these two pieces (the inset) over the intersection of the XFrame Capture hiding any wire ends to the backside of the bezel, and lightly mark the legs of the capture where they should be bent up with a permanent marker.
- Take the inset out and gently bend each leg up gradually just to the outside of the marks with a chain- or flat-nose pliers.
- Re-insert the inset and finish bending legs up and over, again gradually but firmly. Work slowly around the piece to ensure a tight and efficient fit. (Note: The leg ends—or prongs—should reach over the inset by about 1/4” to capture the frame to the bezel.)
- Finish the necklace off by threading grosgrain ribbon through the loops of the self-bailed frame.
- Finish the ribbon ends with knots or short coils wound on a 1/8” round peg.
- Use Fray-Check to finish the ribbon ends.
- Optional: Glue-in a Swarovski Elements Crystal to the center of the open KatieDids channel.
Brenda Schweder – www.BrendaSchweder.com |