305-3
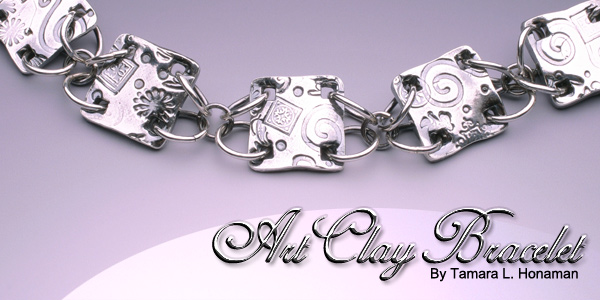
Art-Clay Bracelet
By: Tamara L. Honaman
Materials Needed
- 1 20 gram package of Art Clay Silver, Low-fire F14-2627BS1
- acrylic roller – F14-3070TL
- Texture sheets – F14-3071TL
- Kato Polyclay™ blade – F14-3141TL
- Teflon paper – F14-3083TL
- Files – F14-2022TL
- Kiln – F14-3066TL and fiber blanket – F14-3074TL; Or butane torch – F14-3067TL and fire block – F14-3068TL
- 24 jump rings, 6.8mm – F14-2030FD
- 5 soldered jump rings, 7mm – F14-2057FD
- Lobster clasp – F14-1858FD
- Steel brush – F14-3073TL
- Burnisher – F14-1730TL
Instructions
1. Have all supplies ready – the clay air dries so it’s best
to be prepared before you open the package. Tape four cards together,
repeat for two sets. Lightly oil your roller, the texture plates you’ll
be working with and your hands. Unwrap your clay.
2. Place the clay on top of one texture plate. Place the stacks of cards on either side of the clay, but also on top of the texture plate. Place the other texture plate on top of the clay and the cards. Using the roller, firmly roll out the clay. Once you think you have achieved your desired impression, slightly lift the top texture plate to see if the impression is as you intended. If so, remove the top plate and then carefully lift the clay off the bottom plate. Transfer the clay onto a piece of Teflon.
3. Lightly oil the square cutter you chose, and impress it into the clay. Repeat to make 5 tiles. You’re almost done working the clay while it’s wet - look at the tiles and be sure you are happy with the way they look and the designs you have achieved at this point. Once you pass this stage you can still go back and start over, but it will take more time than if you cut your losses now and ball the clay up and start over.
4. Place the brass tube about 2mm in from the side and the top of the square – make sure you don’t go too close to the edge. As the clay shrinks in the firing process, the distance between the hole and the edge will get smaller, making it a weak spot on the link. Press down until you go all the way through the clay. Remove the tool. Repeat in each corner of the tile. Repeat this again until all 5 tiles have 4 holes. Now it’s time to make one more decision before you let them dry. You can either dry the pieces so they lie flat or curve. If you want them to curve, lay them on the side of a drinking glass (which is lying down and supported so it doesn’t roll away) or any other round surface you might have around which can accommodate the 5 tiles. If you want to let them dry flat, just leave them on the Teflon sheet and be patient! To speed up the process, you can place them, still on the Teflon sheet, inside a dehydrator.
5. Once the tiles are dry, it’s time to refine them so they are near perfect before firing. The clay is most fragile at the leather-hard stage so be very careful handling the tiles. If you treat them as if you’re holding eggshells you’ll be fine! Another good tip is to sand your work over a separate work area. This will help ensure that your “dust” is Art Clay only and can then be added to a container for later use.
You can use a lot of different tools for refining. We recommend starting with a pink salon board, realizing that one side has a coarser grit than the other and will remove material more quickly. Refine the edges of the squares first, removing as little material as possible. You don’t want to remove so much that the holes you made become too close to the edge.
Once you have sanded the edges and are happy with their overall appearance,
check the holes. This is where the files come in handy. Using a square
or round file, refine the inside of the holes, again, not removing so
much material you thin out the edges.
Once you are happy with the edges and the holes you can stop here and
prepare for firing.
6. Place the fiber blanket into the cold kiln, then place the tiles on top of the fiber blanket. Once all the tiles are in position, set the kiln to 1600°F for 10 minutes and press start.
Once the kiln cycle has ended let the kiln cool to room temperature.
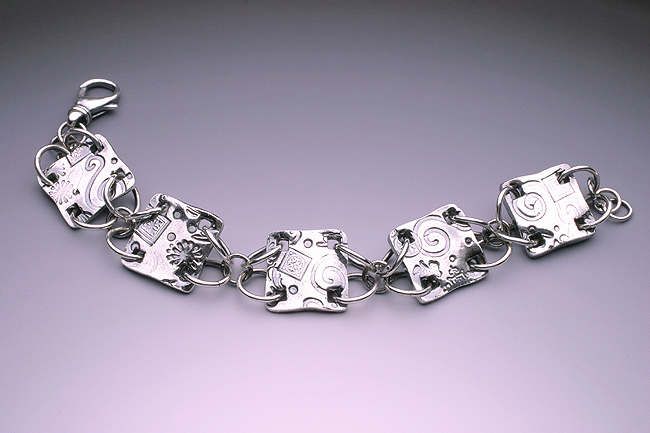
7.The pieces will appear white once removed from the kiln. This is quickly remedied by changing the topography of the silver by brushing with the steel brush. You can further enhance the shine of the silver by going over the surface again with a burnisher. It’s now time to put your bracelet together.
8. Clear away a spot on your work surface and lay out the tiles, jump rings, clasp, and pliers. Open four 6.8mm jump rings.
9. Link an open jump ring into one hole of one tile then add the soldered jump ring; close the jump ring. Repeat so you have two jump rings linked from one tile to the soldered jump ring. Repeat, attaching the next link to the soldered jump ring.
10. Repeat Step 9 until you have all the squares connected.
11. Add a jump ring to each hole on the first square; close the jump rings. Open a jump ring and link it through the two jump rings just added then add the lobster clasp; close the jump ring.
12. Repeat Step 11, adding extra jump rings instead of a clasp, making the length as you see fit for the size of your wrist.
Your bracelet is complete.
You can patina the bracelet with live-of-sulfur or patinating agent of
your choice.
| Project Images | |
 |
|
.