
310-3
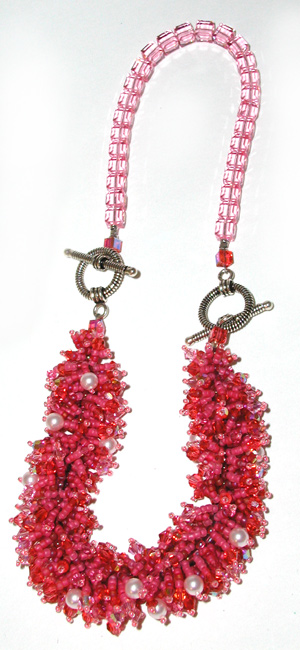
On the Fringe
By: Tamara L. Honaman
300 assorted large fringe beads – F14-4403SB; F14-4327SB
50 diamond crystals, 4mm – F14-1138CY; F14-1132CY; F14-1133CY
80 size 8 seed beads – F14-4493SB
20 grams size 11 beads – F14-4867SB; F14-2464SB
5 grams size 15 beads – F14-2492SB
(you’ll have leftovers of all the above)
8mm Swarovski® cube crystals – F14-2318CY
2 clasps – F14-7836FN
4 crimp tube beads – F14-6914FN
.019 or .012 beading wire
Spool of coordinating Nymo D – F14-1968BS
Beeswax or thread conditioner of your choice – F14-1243BS
Needle – F14-1023BS
Scissors
Chain-nose pliers
Instructions
Creating the core:
1. Cut a length of beading wire approximately 11” long. String on
one crimp tube, one size 8 seed bead, and half of your toggle. Pass the
end of the beading wire back through the size 8 seed bead and the crimp
tube. Using chain-nose pliers, compress the center section of the crimp
tube; securing the clasp end.
2. String size 8 beads onto the beading wire until the core bracelet goes
around your wrist, minus the length of the other half of the clasp.
3. String on one crimp bead, one size 8 seed bead, the other half of the
clasp, and then pass the beading wire back through the size 8 and the
crimp tube. Be sure to leave slack between the beads so you can get your
needle in between the beads; crimp the crimp tube as you did before.
You have completed the core of your fringe bracelet and are now ready
to begin adding fringe.
Adding the fringe:
4. Thread the needle with about 3 yards of thread – do not knot
the end.
5. Bring the thread through the first size 8 bead in the core. Pull the
thread through the bead, leaving about a 6” tail which you’ll
use to knot with later.
6. Add two (or three) size 11 beads and one fringe bead. Bring the needle
back through the two size 11 beads then through the next size 8 bead in
the core.
You’ve just created your first fringe.
7. Add fringe at this length between the first two or three size 8 beads
in the core then increase the fringe to three size 11 and a fringe bead.
Repeat this for a few size 8 beads then increase to four size 11 and a
fringe bead.
8. Continue adding fringe down the length of the core bracelet.
9. Repeat the same pattern of fringe back down the length of the core
to complete two rows of fringe.
10. Begin a third row of fringe. To add more texture, begin to add crystals
to the end of the fringe instead of the fringe beads. To do this, add
your size 11 beads, one 4mm diamond crystal, then a size 15 seed bead.
Pass the needle back through the crystal and the size 11 beads, then through
the next size 8 in the core bracelet.
The size 15 will be your stop bead and hold your fringe in place.
Add fringe-bead and crystal fringe down the entire length of the core
to complete the third row of fringe.
Is your bracelet full enough? If so, you can stop here. If not, add another
row of fringe. Continue to create up to five full rows of fringe.
When you’re done, trim all thread ends.
Creating the second bracelet
11. Cut a length of beading wire approximately 11” long. String
on one crimp tube, one cube crystal, and half of the toggle. Pass the
end of the beading wire back through the cube crystal and the crimp tube
Using chain-nose pliers, compress the center section of the crimp tube;
securing the clasp end.
12. String crystals onto the beading wire until the bracelet goes around
your wrist, minus the length of the other half of the clasp.
13. Crimp the beading wire onto the second half of the toggle –
be sure to leave slack between the crystals so your beads drape nicely
and aren’t rigid.
You have completed the second bracelet – wear it on your wrist
with the fringed bracelet, or link corresponding halves of the toggles
and wear around your neck for a dramatic choker!
| Project Images | |
 |
|