311-1
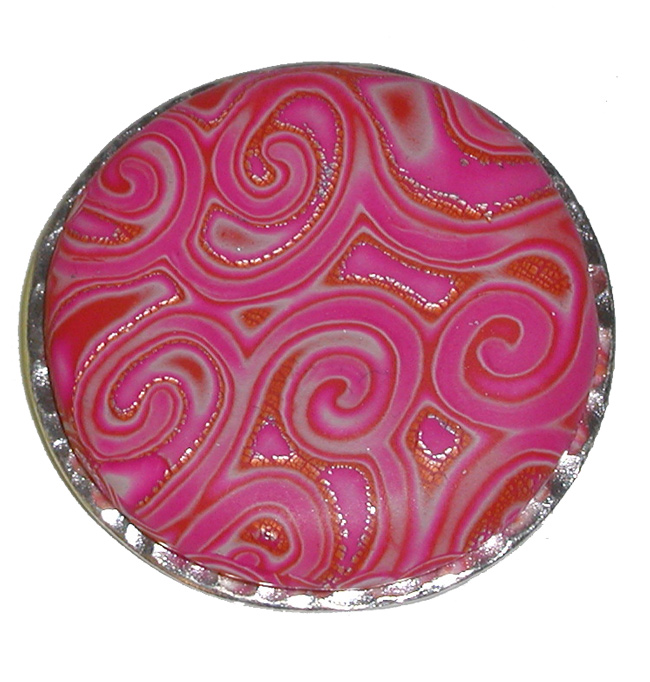
Stamped Mokume-Gane Pendant using Hill-Tribe Silver
Pendant
By: Judy Belcher
There are many different techniques in polymer clay that are called “Mokume gane” because they all involve thin layers of clay which are manipulated to reveal beautiful patterns. One interesting technique uses a rubber stamp.
In a quest to find ways to attach polymer clay to findings, something that usually requires adhesives – which don’t last, we experimented with a Hill-Tribe silver beading disc. The disc has loops in the center of it, which are intended to be used for attaching beaded fringe. The loops give the polymer something to “latch” onto, offering a permanent attachment – making these discs a wonderful way to display polymer clay.
Materials Needed
Hill Tribe Silver Beading Disc Item - F14-6517MB
1/8 block of turquoise Kato Polyclay - F14-2604BS
1/8 block of white Kato Polyclay - F14-2606BS
1/8 block of violet Kato Polyclay - F14-2602BS
Kato Clear Liquid Medium - F14-3140TL
Kato nublade - F14-3141TL
Acrylic rod - F14-3070TL
Silver Leaf - F14-2624BS
Clay dedicated pasta machine - F14-3166TL
Deeply etched rubber stamp
Clay dedicated baking sheet
1 ½ inch circle cookie cutter
Plastic wrap
Spray bottle with water
Instructions
1. Condition all clay well by kneading by hand or by running thin sheets
of clay through a pasta machine until soft and pliable.
2. Roll out each color of clay on the #6 (relatively thin) setting of
the pasta machine. The sheets should be the approximate size of the texture
sheet or stamp you are using.
3. Layer the turquoise, white, and violet sheets. Run this new layered
sheet through the pasta machine on the #4 setting, #5, and then #6.
4. Cut the sheet in half and stack one on top of the other. Roll these
sheets again through the #6 setting of the pasta machine.
5. Cut the sheet into thirds. Stack the sheets, one on top of the other
with a layer of silver leaf between each sheet. The stack should be: clay,
silver leaf, clay, silver leaf, clay.
6. Lay the clay on a glass or ceramic surface; you want the clay to stick
to the surface. Stabilize the surface so it doesn’t move around
on your tabletop.
7. Spray the texture sheet with a fine mist of water. Lay the texture
sheet down against the clay.
8. Using an acrylic rod, firmly roll across the texture sheet impressing
the texture deep into the clay. Only roll across the surface one time,
as the image may blur with multiple rolling.
9. Using a very sharp blade, carefully shave off just the raised areas
of the clay. Work in small areas of the sheet and try not to cut too deeply,
as some of each of the colors of clay and silver leaf must remain to form
the pattern.
10. Beginning with the thickest setting, roll the finished sheet through
the pasta machine. Reduce the setting on the machine and continue rolling
the sheet through, progressing until the sheet is smooth.
11. Roll out a sheet of violet clay on the #1 (thickest) setting of the
pasta machine.
12. Place the patterned sheet of clay onto the violet clay. Using the
acrylic rod, carefully roll across the surface, working out any air that
might get trapped between the layers.
13. Lay a sheet of plastic wrap over the surface of the clay sheet; stretch
so there are no wrinkles present.
14. Choose a section of the sheet that appeals to you and press the circle
cookie cutter straight down over the clay. Remove the plastic wrap --
notice the nicely beveled edges of the piece.
15. Roll out three tiny snakes of clay from the clay that is left over.
Place the snakes of clay through the beading loops of the Hill-tribe silver
disc. Press the finished piece from 14, down onto the loops and firmly
onto the clay snakes. Turn the disc over, then press the clay firmly on
a clean sheet of typing paper resting on the tabletop; this will smooth
the surface of the pendant.
16. Bake for 30 minutes at 275°F. Remove the pendant from the oven
and allow to cool.
17. To keep the silver leaf from tarnishing, place a few drops of the
Kato Clear Liquid Medium onto the clay pendant and spread in a circular
motion with your finger. Bake again for 10 minutes at 275°F. Remove
the pendant from the oven and allow to cool. Buff with a piece of denim
| Project Images | |
 |
|