513-2
Beading Lesson
How to Finish Fiber Designs
By: Katie Hacker
Sponsored by:
Beadalon®
With all of the hot fibers available for jewelry making, it’s essential to know how to finish the ends. In today’s Beading Lesson, we will show you a variety of different ways.
 A c-crimp
cord end makes it easy to hold the fiber ends together. Just
place the ends inside and use chain nose pliers to squeeze the cord end
shut. You can also knot the ends first and then clamp the knot inside
the cord end. Use a jump ring to attach half of a clasp to each cord end.
A c-crimp
cord end makes it easy to hold the fiber ends together. Just
place the ends inside and use chain nose pliers to squeeze the cord end
shut. You can also knot the ends first and then clamp the knot inside
the cord end. Use a jump ring to attach half of a clasp to each cord end.
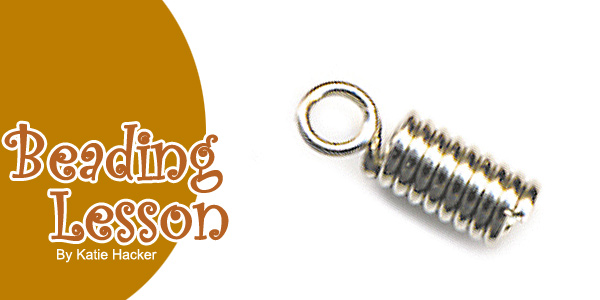
 Spring
cord ends are another simple way to fasten the ends together.
The spring is a coil of hardened wire with a loop on one end. Place the
fiber ends inside the spring and use chain nose pliers to close the first
one or two loops. Be careful not to smash the loops flat. If you turn
the coil as you’re squeezing with the pliers, you get a more polished
look. Attach half of a clasp to the other end.
Spring
cord ends are another simple way to fasten the ends together.
The spring is a coil of hardened wire with a loop on one end. Place the
fiber ends inside the spring and use chain nose pliers to close the first
one or two loops. Be careful not to smash the loops flat. If you turn
the coil as you’re squeezing with the pliers, you get a more polished
look. Attach half of a clasp to the other end.
You can also create your own wire-wrapped finish. It’s a little more work but gives you a similar look. If you wrap it yourself, you can use coordinating ColourCraft™ colored craft wire. Hold the fiber ends together and fold them over the wire. Wrap the wire around the fibers in a tight coil, leaving the fold exposed. Use chain nose pliers to press the wire end in to prevent snagging on clothing. Attach half of the clasp to the wire loop.
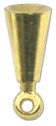 Cones
give fiber jewelry a very finished look. Make a wrapped wire loop. Attach
the loop to the end of the fibers, then pull the wire end through the
open end of the cone. Make another loop outside the narrow end of the
cone and attach it to half of the clasp.
Cones
give fiber jewelry a very finished look. Make a wrapped wire loop. Attach
the loop to the end of the fibers, then pull the wire end through the
open end of the cone. Make another loop outside the narrow end of the
cone and attach it to half of the clasp.