611-2
Beading Lesson
Beaded Edging and Fringe
By: Katie Hacker
Sponsored by:
Beadalon®
Beaded fringe and edging is an easy way to add a dramatic touch to fabric. In today’s Beading Lesson, we’ll show you how to create your own.
Since most beaded edging is going to be attached to clothing, be sure to use a heavy-duty beading thread like Dandyline that will stand up to wearing and washing. Choose a spun thread with zero stretch that’s water resistant and remember to hand-wash beaded clothing.
You’ll also need a hard beading needle. Sewing needles and beading needles are similar, but a sewing needle has a tapered eye. The eye on a beading needle is in line with the shaft of the needle to make it easier for beads to pass over it.
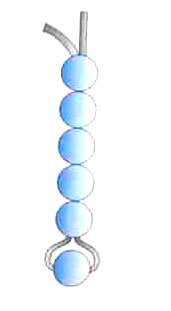
To make straight fringe, thread a needle and knot the end. Pass through the fabric and string a measured amount of beads onto the thread. Pass back through all of the beads except for the last one. Stitch through the fabric and tie a knot. Leave 1/4” and make another straight fringe.
To make loopy fringe, thread a needle and knot the end. Pass through the fabric and string a measured amount of beads onto the thread. Pass through the fabric near the beginning of the first stitch. Leave ¼” and make another loopy fringe.
Fringe can also be attached to loomwork, amulet bags or other beadwork
projects.
For more ideas and inspiration visit www.katiehacker.com