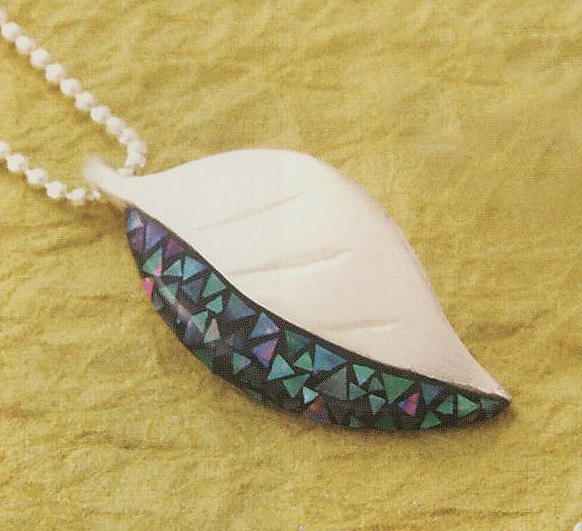
Creating the Silver Pendant
1) Open the package of clay and roll out using 2mm slats. Place the leaf template on the clay and cut out with craft knife. Wrap extra clay in clear wrap and replace in clay pouch.
2) Place a small amount of olive oil on the tooth pick and push sideways through stem of leaf, twisting to center the toothpick. Make sure there is sufficient clay around the toothpick. Build up if necessary, using extra clay from around template. Dry throughly on the cup warmer.
3) Use the flat files to smooth the edges and surface. With the pencil, draw a curved line, ¼” below the toothpick, and about 1/3 from the left side of the leaf, down to the point. Draw a short, perpendicular line from the top of the first line to the left edge of the leaf.
4) With the craft knife, carefully remove clay from this bordered area on the left so it is about 1mm lower than the rest of the leaf and there is a clean, clear edge. Use the edge of the craft knife to remove the clay in thin curls. This clay can be saved in your Paste jar or in a small container, such as a film cannister.
5) Sand the entire upper surface of the leaf with sanding pads and brush clean. Twist the toothpick slightly to remove. If toothpick will not come out, do not force. It will burn away when the piece is fired.
6) Fire the piece with the butane torch on the fire brick for 2 minutes after seeing a salmon-colored glow. If firing in a kiln, fire at 1472 F. for 5 minutes. Allow to cool completely.
7) Brush to reveal the silver and, using water, create a mirror finish on the surface, sides and back of the pendant with the sanding pads; begin with the coarsest grit and move up through subsequent grits until all grits have been used and piece is very shiny.
Applying the Inlay
8) Place the small jar of clear UV resin on the cup warmer for at least 5 minutes. This will heat the resin and make it thinner for easier application. Remove the lid and use a clean toothpick to transfer a dime-sized amount of resin to one corner of the clean, glass square.
9) On the opposite corner of the same square, place a small drop of black, opaque dye. Using a different toothpick, drag enough of the dye to the clear resin and begin folding it into the resin. Do not whip. This will add unwanted bubbles in the resin.
10) Apply a very thin coat of the black, UV resin to just the left, cut-out portion of the leaf pendant. Be careful not to get any resin on top of the shiny surface of the leaf. If that happens, put some of the UV cleanser on a cotton swab and carefully remove it.
11) Once the resin has been applied, hold the pendant between your thumb and forefinger and tap lightly on the table, allowing the resin to level itself. Then, put the pendant aside and place a few drops of water on the top surface of the rubber block. Then place the small slice of abalone on the wet surface. This will keep the tiny pieces of abalone from flying off when cut.
12) With the craft knife, cut very, very thin slices of the abalone with a single, downward motion; then go back and cut these same slices diagonally first in one direction, then the other so that you ultimately have very tiny triangles of abalone shell.
13) Place the pendant with the UV resin next to the pieces of abalone shell and use the tweezers to transfer them to the surface of the UV resin one by one. Do not press the pieces into the resin, but allow them to float on the surface. Do not fill in every single area but allow the black resin to peak through like a mosaic. Apply the abalone pieces to the edge and against the notched border.
14) Place the pendant under the UV light and turn on. Leave for at least 1 minute. Remove and tap with the tip of a toothpick to check. Surface should be hard.
15) With a clean toothpick, apply fresh, clear resin to the surface of the inlay only, avoiding the remainder of the silver pendant. Again, hold the pendant between your thumb and forefinger and tap slightly to settle the resin. Coating should be just thick enough to cover the abalone and be even with the silver surface of the leaf. Surface tension should cause the resin to flow to the edge of the leaf, but not over. Remove any unwanted resin with the swab wetted with cleanser.
16) Return the pendant to the UV light and turn on. Leave at least for 1 minute or until surface is hard and shiny. At this point the surface will still be tacky, even if resin is cured. Soak a clean swab in cleanser and squeeze out excess. Wipe the surface of the resin repeatedly until no longer tacky.
17) Lastly, apply a spot of silver polish to the cloth and polish the entire surface of the pendant, using a clean area of the cloth to buff to a mirror finish. Your piece is ready to add a chain!
|