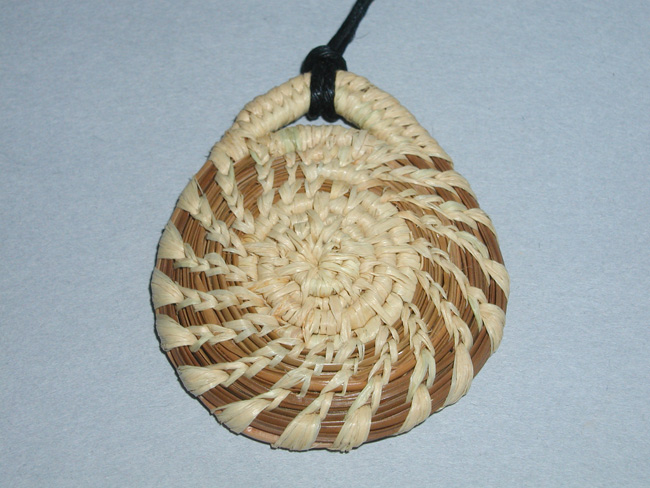
Using pine needles as the core and raffia as the binder you can make this beautiful broach.
Techniques
Flat circular Coiling
Figure 8 stitch
Split stitch
Ending coil
Attach pin back
Materials needed
Raffia - 10 – 20 lengths of raffia, approximately 5 feet each length
Pine needles - 30 to 60 long pine needles
Embellishments:
Pin back
Tools
Scissors
Tapestry needle
Instructions
Prepare the pine needles by soaking them in warm water for 2-4 hours. Take them out of the water… Wrap them in a wet towel and then put the wrapped pine needles in a plastic bag…. This process will them allow them to mellow. Leave them in the b\plastic over night. You want the needles to be flexible, have some moisture, but not be wet.
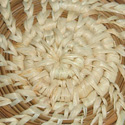
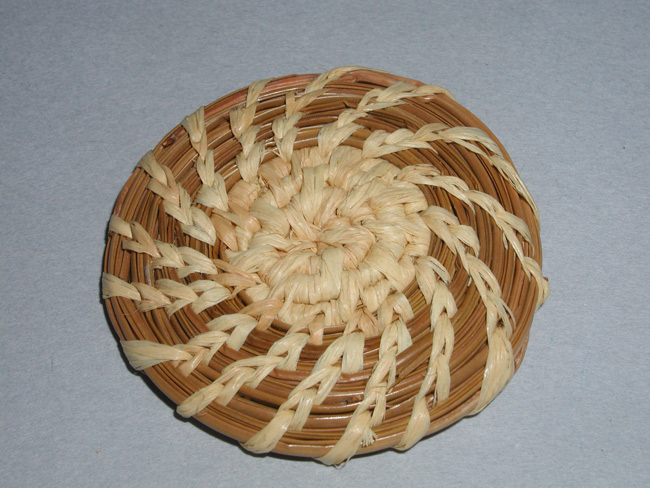
1. Begin the round base by tying 2 needles in a circle with raffia. Pull the ends of the needles to close in the circle and begin stitching into the circle and looping around the pine needles. Once the small base is started position the binder raffia thread, for it to stitch from around the back top of the last core of needles. Hold the base so that the long ends of the core will be to the left to begin the stitching.
2. Figure 8 stitch will be done for the 1st couple rows to secure. Stitch the raffia over the coil, and bind it toe the 1st circle by wrapping around it to make the connection. Then just wrap the needles solid for several stitches until you connect to the previous row again. During these coils it may be necessary to add in both new binder and more core material. Add by inserting the end of the pine needle into the core area and continue. If binder material (raffia) is needed lay the old one on the pine needles then lay the new end along the coil, and wrap the new binder over its self and continue. You can also tie a knot and place it in between the coils as you continue.
3. Begin the split stitch, and complete the remainder of the broach with this stitch, by stitching into the previous coil, instead of wrapping it to connect. In stead of wrapping around the bundle of pine needles you will skip a small area and stitch again. This method will allow the pine needles to show. This stitch will expose the core of pine needles and allow you also go faster. The split stitch will be spaced approximately 1/8 inch apart.
4. Once the broach is large enough in diameter, so that the pin back will fit, you can finish the broaches diameter. Finish the broach by cutting the pine needles at an angle and stitch the entire edge solid, by wrapping solid. Stitch the pin back on with a piece of raffia. Be sure to stitch only on the back side of the broach, when anchoring the pin back.
5. This simple broach can be easily be made into a necklace. Areas can be left open with in coiling, simply by not anchoring the current row of coiling to the previous one.
|